 Bilal Siddiqui
Key takeaways
Profitability & Feasibility: Selling on Amazon requires an honest evaluation of whether your specific product can survive Amazon's fees and still leave a healthy margin, and whether you can fund your inventory ahead of revenue.
Business Registration is Optional: You do not need to have a registered business or an LLC to sell on Amazon; you can sign up as an individual.
Essential Documents: To register, you will strictly need a government-issued ID, an internationally chargeable credit card, a bank account, tax information, and proof of your residential address dated within the last 180 days. Document mismatches or blurry photos are the most common causes of registration delays.
Selecting the Right Selling Plan:
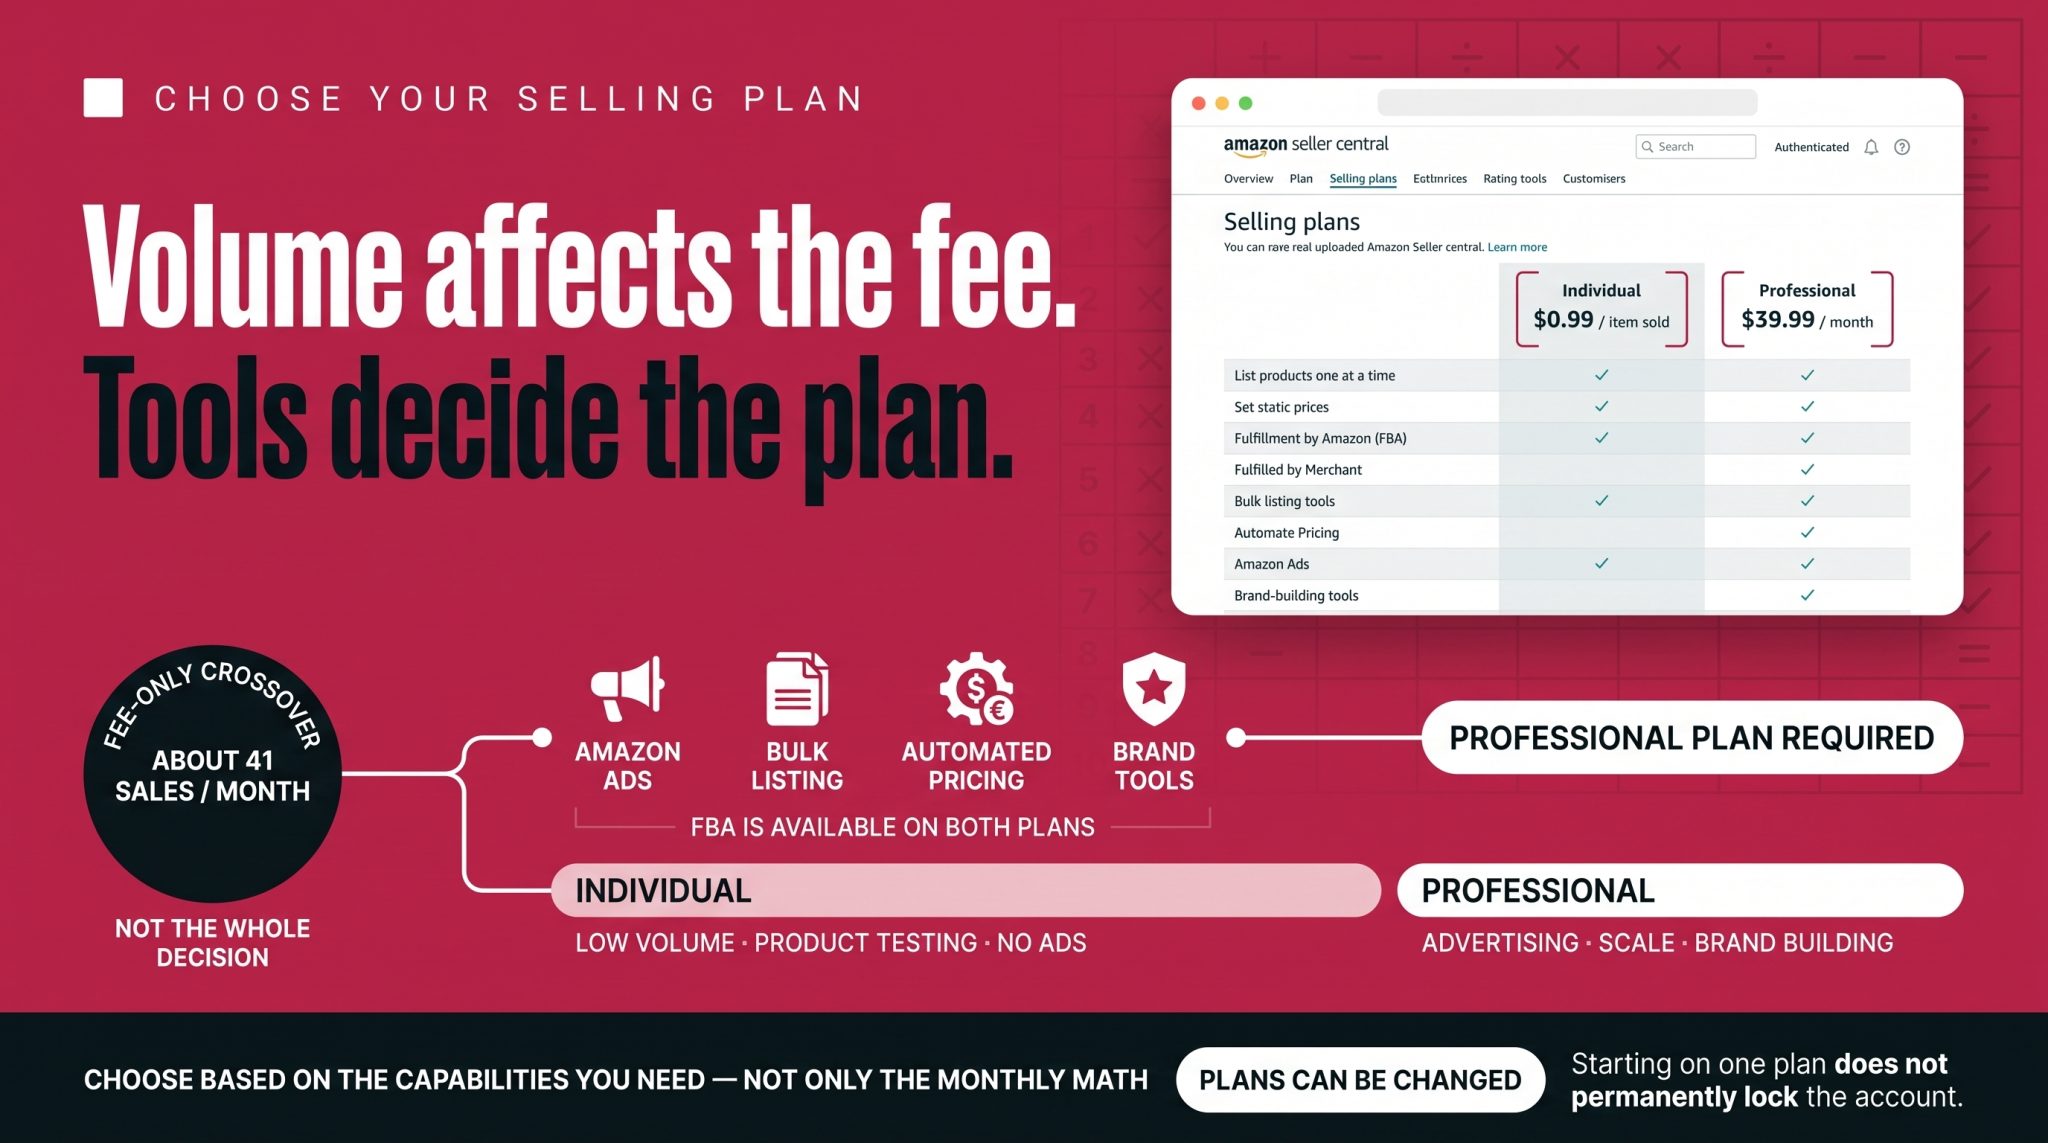
The Individual plan costs $0.99 per item sold, while the Professional plan costs $39.99 per month.
You should choose the Professional plan if you need access to advertising, bulk listing tools, automated pricing, or brand-building tools, regardless of your monthly sales volume.
Fulfillment by Amazon (FBA) is available on both selling plans.
Hidden Fee Structures: The referral fee (Amazon's commission) is calculated based on the total price of the sale, which includes the product price plus any shipping and gift-wrap charges. Always use Amazon's Revenue Calculator to model costs before ordering inventory.
Check Restrictions Before Sourcing: Never buy inventory without first checking if the product is restricted. You can verify this by searching the item's ASIN or barcode in the "Add Products" tool in Seller Central to see if Amazon requires specific approval or invoices.
Fulfillment Strategy: You can choose between FBA (where Amazon handles storage, packing, shipping, and customer service) or merchant fulfillment (where you handle storage and shipping yourself). Many sellers use a combination of both depending on the product's size and turnover rate.
Most people who search for how to sell on Amazon are not really asking for a list of registration steps. They are asking a harder question underneath it: is this worth doing, and what am I actually signing up for?
That is a fair thing to want answered first. Amazon puts an enormous amount of ready-made customer demand in front of you, and it will handle storage, delivery, and customer service if you want it to. It also charges a meaningful share of every sale, expects you to hold inventory, and holds you responsible for the health of your account from the first order onward. None of that is hidden, but it rarely appears in the same place as the setup instructions.
This guide covers both halves. It walks through whether Amazon fits your product and your resources, what Amazon requires before it will approve you, how the two selling plans differ, what the fee structure really looks like once you add everything up, and how to register, verify, and prepare your account. It stops where a different job begins: the moment your account is approved and ready for its first listing.
Is selling on Amazon still worth it?
The honest answer is that it depends on what you sell, what your margin looks like after fees, and how much working capital you can tie up in inventory. Amazon rewards some businesses generously and quietly erodes others. Knowing which one you are is worth more than any amount of enthusiasm.
Start with what genuinely works in your favor. The clearest advantage is that you are not building demand from scratch. People arrive on Amazon already intending to buy, often already searching for the type of product you sell, which is a fundamentally different starting position from a new standalone website where you must pay to attract every visitor. Alongside that, you inherit a level of customer trust that would take years to build independently. Shoppers who have never heard of your brand will still buy from you because they trust the checkout, the delivery promise, and the returns process behind it.
The infrastructure is the second advantage. Through Fulfillment by Amazon, you can store products in Amazon's fulfillment network and have Amazon pick, pack, ship, and handle customer service and returns. For a small operation, outsourcing that entire function on day one is not a small thing. Once you are established, the advertising and brand-building tools available inside the platform give you ways to grow that most independent stores cannot match at the same cost.
Now the parts that catch people out.
Competition is the obvious one, but it is worth being specific about how it bites. On Amazon, competing offers often appear on the same product page rather than on separate websites, which puts sustained downward pressure on price. If your product is undifferentiated and your cost base is average, that pressure will find you.
Fees are the second. Between the selling plan fee, the referral fee on every sale, fulfillment costs, storage, returns, and advertising, a substantial share of each sale goes back to Amazon before you see anything. This is not a reason to avoid the channel, but it is a reason to model your numbers honestly before you order inventory rather than after.
Then there is capital. Inventory has to be paid for before it sells, and if you use FBA it has to be shipped into the network before it earns anything. Slow-moving stock costs you storage and ties up cash you could have used elsewhere.
Finally, there is the operational responsibility that comes with the account itself. Amazon holds sellers to performance standards covering things like order defects, late shipments, and policy compliance. Returns and customer service expectations are set by Amazon, not by you. Selling here means accepting that you operate inside someone else's rules, and that those rules can change.
So the useful question is not whether Amazon is worth it in general. It is whether your specific product can carry Amazon's fee load and still leave a margin you are happy with, whether you can fund inventory ahead of revenue, and whether you are prepared to run this as an operating business rather than a passive one.
Who can sell on Amazon?
Amazon is open to a broad range of applicants: individuals selling a handful of items, sole traders, established retailers, manufacturers, and brand owners. You do not need to be an established company, and you do not need a track record in ecommerce.
What you do need is the ability to satisfy Amazon's verification requirements, which is where eligibility actually gets decided in practice.
The most common worry is whether you need a registered business. You do not. Amazon states directly that you do not need to be an LLC or otherwise incorporated business to sell in its store. If you are operating as an individual, you select None, I am an individual as your business type and the registration process adjusts to collect the relevant information from you instead. Whether forming a company is right for you is a separate question involving liability and tax, and one to raise with an accountant rather than resolve from a blog post.
Selling from outside the United States
You do not have to be based in the US to sell in the US store, but the eligibility is conditional rather than universal. In practice, you generally need to reside in a country that Amazon currently accepts for seller registration, have a valid phone number, hold an internationally chargeable credit card, and be able to complete Amazon's identity, banking, address, and tax verification requirements from where you are.
Amazon maintains the current list of accepted countries in its help center, and both the list and the surrounding requirements change over time. Check Amazon's countries accepted for seller registration page for the current position before you make plans around it, rather than relying on any third-party list.
One practical note on scope: a selling account created through sell.amazon.com covers the US, Canada, Mexico, and Brazil. Selling in Europe, Asia-Pacific, or the Middle East and North Africa involves separate accounts, with Global Selling tools available to help manage listings and pricing across them.
Selling on Amazon versus selling to Amazon
This distinction confuses more beginners than almost anything else, and it determines which guide you should be reading.
Nearly everyone who searches for how to sell on Amazon means third-party selling. You create a selling account, you list your products, you set your prices, you own the inventory, and Amazon takes a fee on each sale. You remain the seller of record. This guide is about that.
The alternative is first-party selling, where Amazon buys your products wholesale and resells them as retailers. You are a supplier rather than a seller, Amazon controls retail pricing, and the relationship runs through Vendor Central rather than Seller Central. That program is invitation-based, so it is not something you can simply sign up for. If you have received an invitation or you are weighing the two models against each other, our Amazon Vendor Central guide covers that relationship properly.
There are also several distinct ways to operate as a third-party seller, including private label, wholesale, retail and online arbitrage, dropshipping, publishing through Kindle Direct Publishing, and selling to business customers through Amazon Business. Each has different capital requirements, different risk profiles, and different rules. Our Amazon selling models guide compares them, and it is worth reading first if you have not yet settled on how you want to source and sell.
What you need before you register
Gathering these in advance is the single easiest way to make registration painless. Amazon publishes the list, and it is short:
A government-issued ID. An email address, ideally one not already tied to an existing Amazon customer account unless you specifically want the accounts linked. An internationally chargeable credit card. A bank account and routing number. A business registration or license, where applicable. Proof of your residential address dated within the last 180 days, such as a bank or credit card statement. And your tax information.
A few of these deserve explanation, because they are where applications tend to snag.
The email address. Amazon recommends using an address separate from any existing Amazon customer or Amazon Business account. The exception is if you already have an account with Brand Registry, Amazon Ads, or Vendor Central. In that case, use the same email and password so access syncs correctly.
The bank account. It does not need to be a US account. Amazon can disburse funds to accounts outside the US through the Amazon Currency Converter, converting into the relevant currency for supported countries. What does matter is that the account is held in your name or your business's name.
The credit card. It must be chargeable internationally. It does not have to be in your name or your business's name, which gives applicants a little more flexibility than most expect.
The proof of address. The 180-day window is enforced, so check the date on the document before you upload it.
Tax information. You will complete a tax interview during or shortly after registration. What you supply depends on where you are based and how you are registering, which is another reason to have your details to hand rather than improvising mid-process.
Individual or Professional: choosing your selling plan
Amazon offers two selling plans, and this is the first meaningful decision you will make. Get it right and it costs you nothing. Get it wrong and you either pay a subscription you are not using or find yourself locked out of tools you needed.
The Individual plan has no monthly subscription. You pay $0.99 for each item you sell, on top of the standard referral fee. The Professional plan costs $39.99 per month regardless of how much you sell, with no per-item charge. Both figures apply to the US store and are current at the time of writing. Check Amazon's pricing page for the latest.
Here is what each plan actually includes:
Individual | Professional | |
|---|---|---|
Cost | $0.99 per item sold | $39.99 per month |
Referral fees | Apply | Apply |
List products one at a time | Yes | Yes |
Set static prices | Yes | Yes |
Fulfillment by Amazon (FBA) | Yes | Yes |
Fulfill orders yourself (FBM) | Yes | Yes |
Bulk listing, pricing, and inventory tools | No | Yes |
Automate Pricing | No | Yes |
Amazon Ads | No | Yes |
Brand-building tools via Brand Registry | No | Yes |
Sell B2B through Amazon Business | No | Yes |
Global Selling | No | Yes |
Apps and APIs | No | Yes |
New Seller Guide | No | Yes |
US store, current at the time of writing.
The most common advice you will hear is to compare unit volume against the subscription. That calculation is straightforward. At 40 sales a month, Individual per-item fees come to $39.60, marginally under the subscription. At 41 sales, they reach $40.59 and the Professional plan becomes the cheaper option. So the fee-only crossover sits at roughly 41 units a month.
Leading with that number is a mistake, though, because it treats the two plans as though they differ only in price. They do not. Look at the table again and notice what sits on the Professional side: advertising, bulk operations, automated pricing, business selling, brand tools, and API access. If your plan involves running Sponsored Products campaigns, listing more than a handful of SKUs, selling to business customers, or building a brand presence, you need the Professional plan regardless of whether you have hit 41 sales, because those tools are simply not available on the Individual plan.
Note in particular that Fulfillment by Amazon is available on both plans. A lot of older guidance implies FBA requires a Professional account. It does not.
So the practical decision looks like this. The Individual plan makes sense if you are clearing out a small number of items, testing whether a product sells at all before committing, or running a genuinely low-volume operation with no advertising and no brand ambitions. The Professional plan makes sense if you intend to build something: if you will advertise, list at scale, use automated pricing, or grow a brand.
If you are unsure, the risk is low in either direction. Amazon confirms you can switch or cancel your selling plan at any time after registration, so starting on one plan does not commit you to it.
Amazon also currently offers a set of incentives to eligible new Professional sellers, covering things like advertising credits and fulfillment benefits. Most of them depend on completing specific qualifying actions within defined windows after you list your first product, which makes them worth understanding before you register rather than after. The program changes periodically, so treat any figures you see elsewhere as needing verification. Our Amazon product launch strategy guide covers the current incentives and the launch sequence that unlocks them.
What it actually costs to sell on Amazon
There is no single answer to what it costs to start selling on Amazon, and any figure presented as one should be treated with suspicion. Your total depends on the product, the marketplace, your fulfillment method, how much inventory you hold, and which plan you are on. What is useful is understanding the categories of cost, so you can build your own number.
The selling plan fee is the one you already know: $0.99 per item or $39.99 per month.
The referral fee is Amazon's commission on every sale, and it is the cost most new sellers underestimate. It is charged as a percentage of the total price or a minimum amount, whichever is greater, and the percentage varies by category. The detail that catches people out is what "total price" means. It includes the item's list price plus shipping costs and any gift-wrap charges, not just the price of the product itself. On low-priced items where shipping is a large share of the total, this materially changes your margin.
A few examples from the US store, to show the shapes these fees come in:
Category | Referral fee | Minimum |
|---|---|---|
Home and Kitchen | 15% | $0.30 |
Computers | 8% | $0.30 |
Clothing and Accessories | 5% up to $15; 10% from $15 to $20; 17% above $20 | $0.30 |
Jewelry | 20% up to $250; 5% on the portion above $250 | $0.30 |
Amazon Device Accessories | 45% | $0.30 |
US store examples, current at the time of writing. These illustrate flat, tiered, and outlier structures. They are not a complete schedule.
Two things matter here. First, the full category list is longer and more nuanced than any table can usefully reproduce, so check Amazon's referral fee schedule for the current rates. Second, and this trips up more sellers than the rates themselves, a product's fee category is not always the same as the category customers see in the store. Confirm which fee category your specific product falls into before you build a margin model around it.
Media items, including books, DVDs, music, software, and video, carry an additional closing fee per item on top of the referral fee.
Beyond those two standard fees, the rest of your cost base depends on how you operate. Fulfillment is either Amazon's per-unit and storage charges under FBA, or your own packaging, labor, and carrier costs if you ship yourself. Neither is automatically cheaper; it depends on your product's dimensions, weight, and turnover. Storage scales with how long stock sits, so slow-moving inventory costs more than fast-moving inventory. Advertising is optional in principle and close to necessary in practice for new products, since a listing with no sales history has little to make it visible. Returns cost you both the fulfillment work and a portion of the fees, depending on category and circumstances. Product preparation and labeling, such as poly-bagging or barcode labels, is either your labor or a service you pay for. Sourcing and inbound shipping is usually the largest line item and the one that has to be paid first. Currency conversion applies if you disburse to an account in a different currency, and tools or professional support are genuinely optional, though most sellers pay for something in this bracket eventually.
One last point. Amazon's fees change. Referral percentages, fulfillment rates, and storage charges are all reviewed periodically, and a figure that was accurate last year may not be accurate now. Rather than working from any published summary, use Amazon's Revenue Calculator to model a specific product against the current schedule, and re-check before you make pricing decisions.
Restricted, gated, and approval-required products
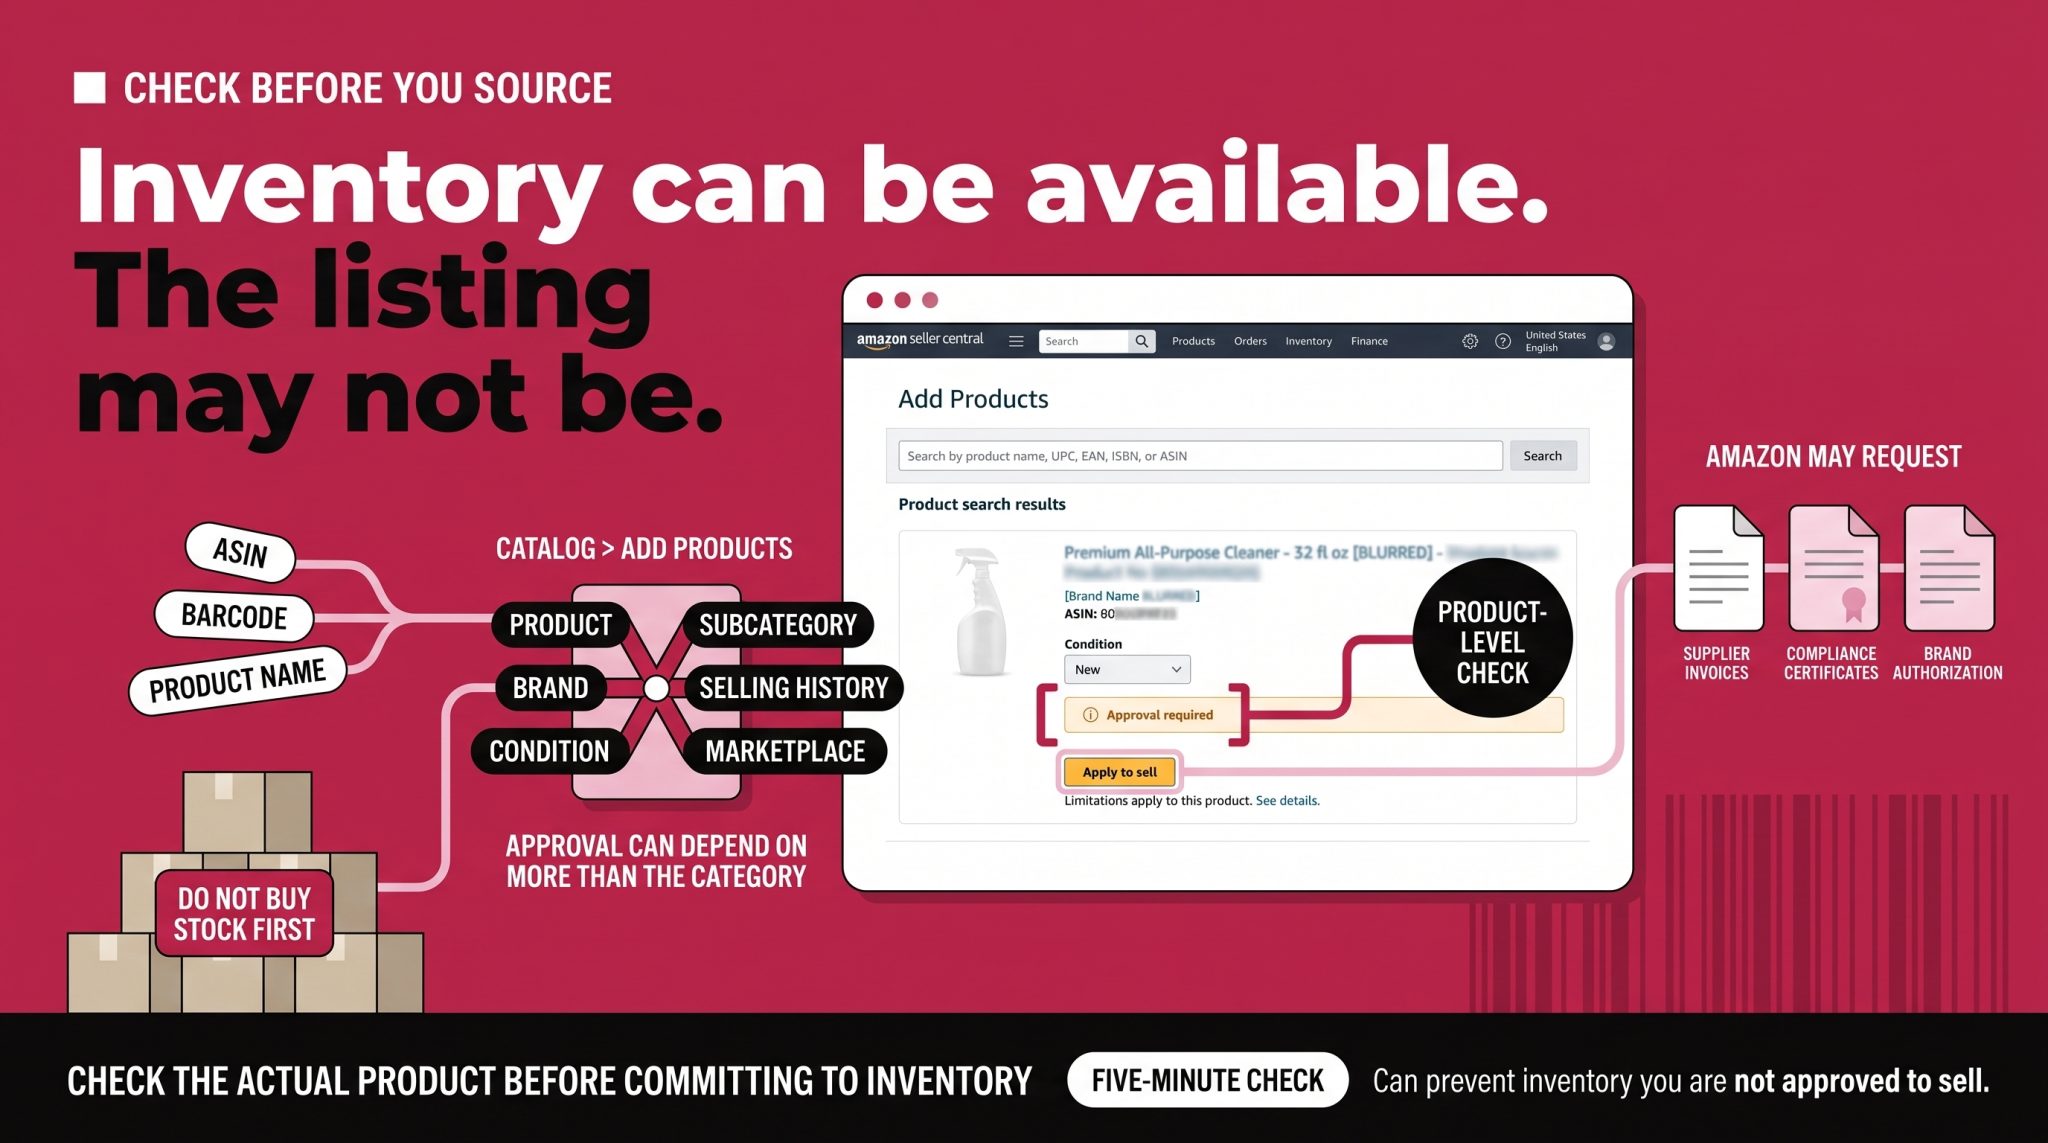
Not everything can be listed the moment your account is approved. Amazon restricts certain products and requires approval before you can sell them, generally where there are safety, authenticity, regulatory, or quality concerns.
The important thing to understand is that this is not a simple list you can check once. Whether approval is required can depend on the specific product, the brand, the item's condition, the subcategory, your selling history, and the marketplace you are selling in. A category that is broadly open can contain subcategories or individual products that are not, which is exactly how sellers end up with inventory they cannot list.
The reliable way to check is to look at the actual product rather than the category. In Seller Central, go to Catalog > Add Products and search for the item by ASIN, barcode, or name. The result will show you whether limitations apply and, where they do, give you the option to apply for approval along with the specific documentation Amazon wants. That often means invoices from a manufacturer or distributor, compliance certificates, or brand authorization.
Do this before you buy inventory. Sourcing stock for a product you turn out not to be approved to sell is one of the more expensive early mistakes, and it is entirely avoidable with a five-minute check.
Choosing what to sell before you register
Product selection deserves far more depth than this guide can give it, and it has its own dedicated resource. But a few things belong here, because they influence whether you should register at all.
Before you commit, you want reasonable confidence on five points: that there is genuine demand for the product, that the existing competition is something you can compete with rather than simply join, that your margin survives Amazon's fees at a realistic selling price, that the product is not restricted in a way you cannot resolve, and that you can source it reliably and repeatedly.
The third of those is the one people skip. It is easy to look at a product selling at $25 and assume the economics work. Subtract the referral fee, fulfillment, storage, a return allowance, and advertising, and the picture often looks very different. Run those numbers on your actual candidate products before you order anything.
For the full methodology, covering how to size demand, read competition, and validate a niche properly, see our product research and niche validation guide.
How to create your Amazon seller account
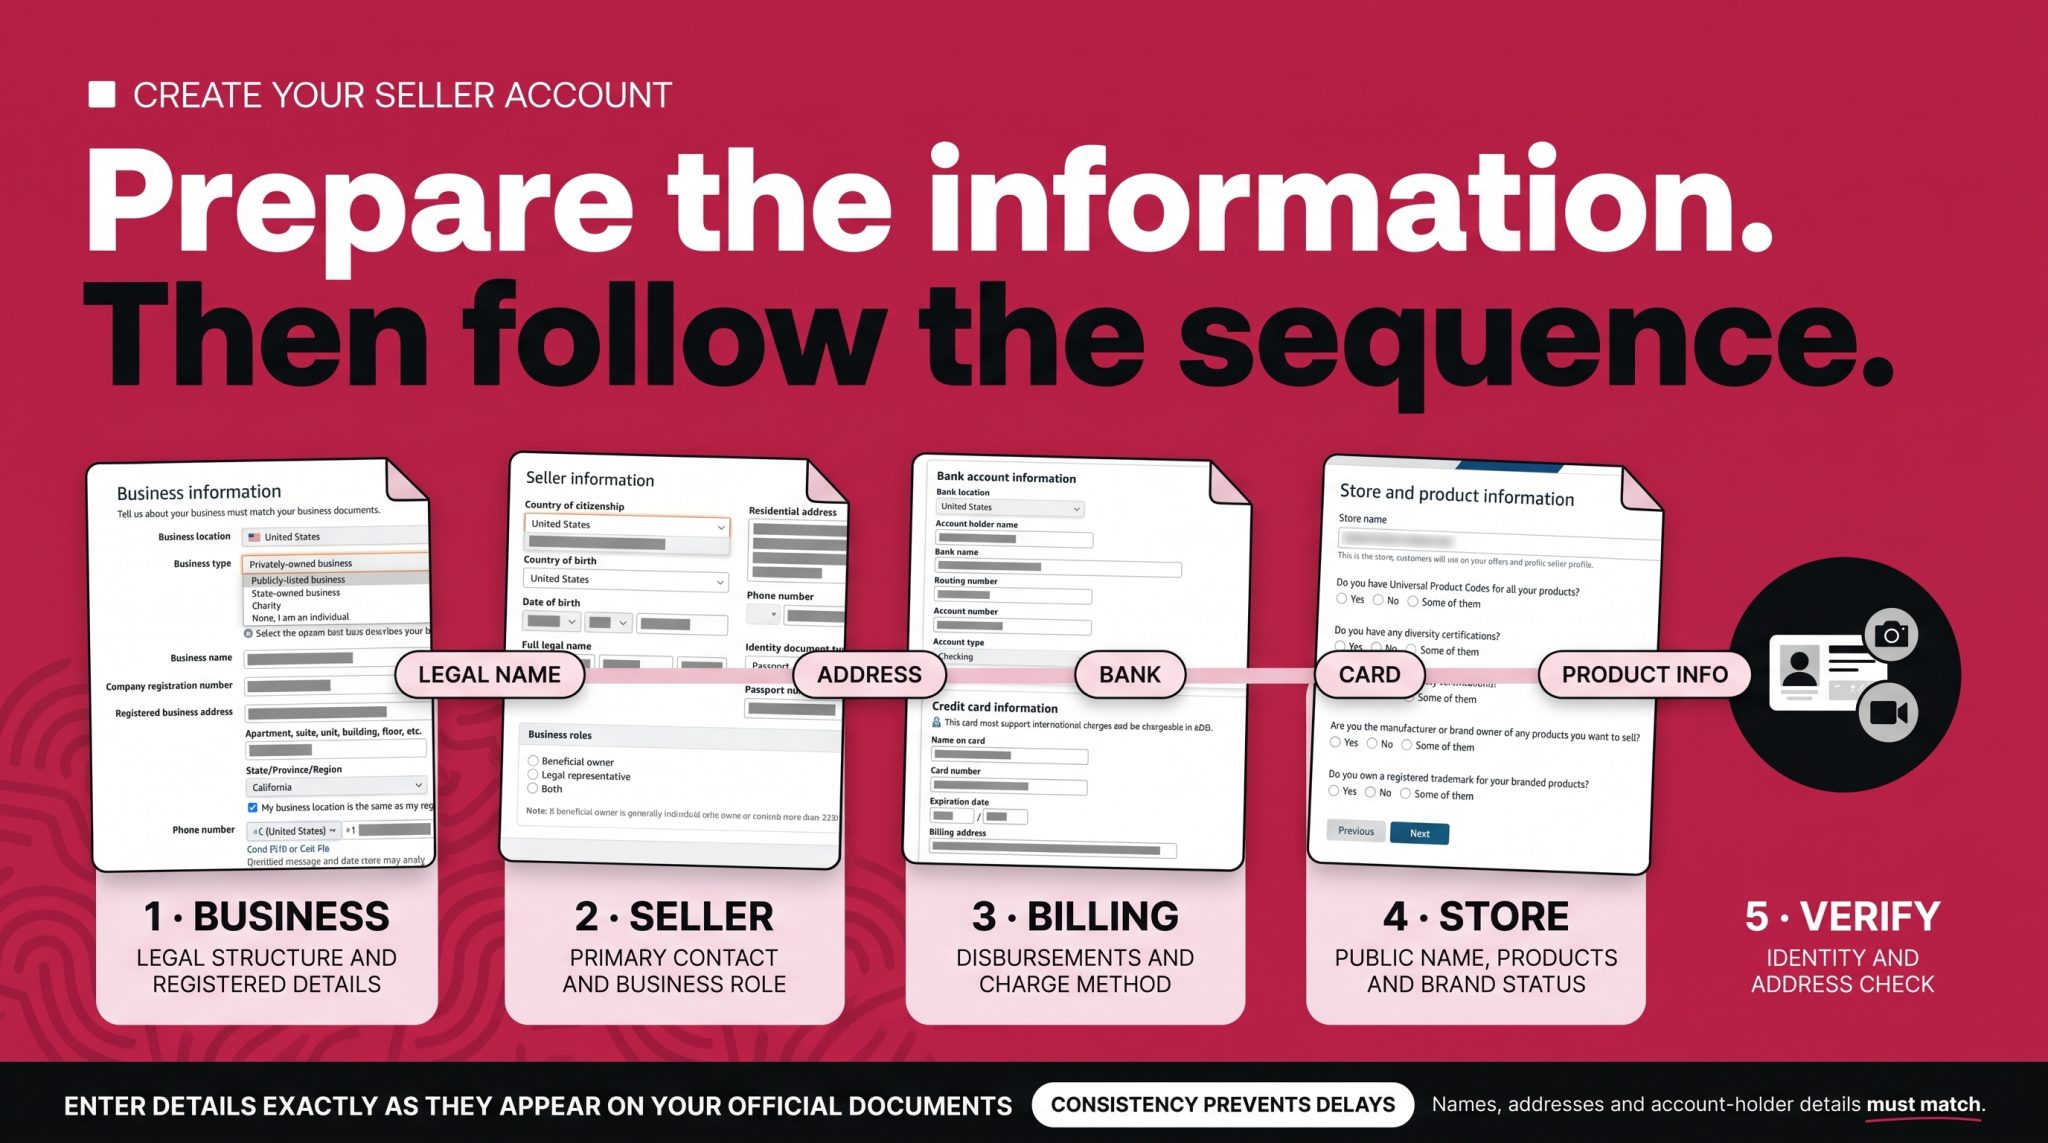
Registration runs in five steps. Amazon's own guidance is that timelines vary but that the process can often be completed in a few hours, with identity verification usually taking three business days or less. Treat that as Amazon's expectation rather than a guarantee, since individual cases vary and no application is guaranteed approval.
Before the five steps, you will create your account credentials. Click Sign up on sell.amazon.com, enter your name, email address, and password, and confirm. Use the email address you decided on earlier.
Step 1: Business information
You will select your business location, which is the country where your business is registered, or where you are operating from if you are not incorporated. Then your business type, and if you are registering as an individual, this is where you choose None, I am an individual.
If you are registering a business, enter the exact name used when you registered it with the relevant government office, along with your company registration number. Note that this registration number is not the same as an Employer Identification Number, a distinction that catches out US applicants in particular. You will also enter the registered business address as it appears on your business license, and a phone number with country code.
Step 2: Seller information
This step identifies you personally as the primary contact for the business. Use a government-issued ID such as a passport and enter your full legal name including any middle name, country of citizenship, country of birth, date of birth, and residential address, followed by your phone number.
You will then be asked whether you are a beneficial owner of the business, a legal representative, or both. In plain terms, a beneficial owner is someone who owns more than 25% of the business, directly or indirectly, or otherwise controls it. Where no one meets that threshold, a senior manager can be treated as one. A legal representative is someone the business has authorized to act on its behalf, such as accepting terms or opening a payment account. If you are not a legal representative, Amazon may ask for a letter from one authorizing you to act for the business, and it will tell you when that is needed.
If you are registering as an individual, this section is simply about you and is considerably shorter.
Step 3: Billing information
Here you enter your bank details and credit card. The bank account is where Amazon will send your sales proceeds, and it must be held in your name or your business's name. Select the account holder name exactly as your bank has it.
As covered earlier, a US bank account is not required, and the credit card does not need to be in your name.
Step 4: Store and product information
You will choose your store name, which is the name customers see on your offers and in your public seller profile. It needs to be unique across Amazon, but it does not need to match your business name, so if your preferred name is taken, a variation is fine.
You will also be asked about product codes, business certifications, and whether you are a manufacturer or brand owner. Amazon uses product IDs, also called GTINs, to match your items to the right product detail pages. The most common is a UPC, though you may have an ISBN, EAN, or JAN depending on the product. These are usually printed near the barcode on the packaging. If you need to obtain them, they come from GS1. A GTIN exemption is available for eligible products, brands, or categories where Amazon permits an exemption.
If you own a trademarked brand, this is also the point to think about Amazon Brand Registry. It is free but requires a pending or registered trademark, and Amazon recommends enrolling before you list your products rather than after.
Step 5: Identity verification
The final step is verifying that you are who you say you are, and it is covered in detail below because it is where most delays happen.
What happens during identity verification
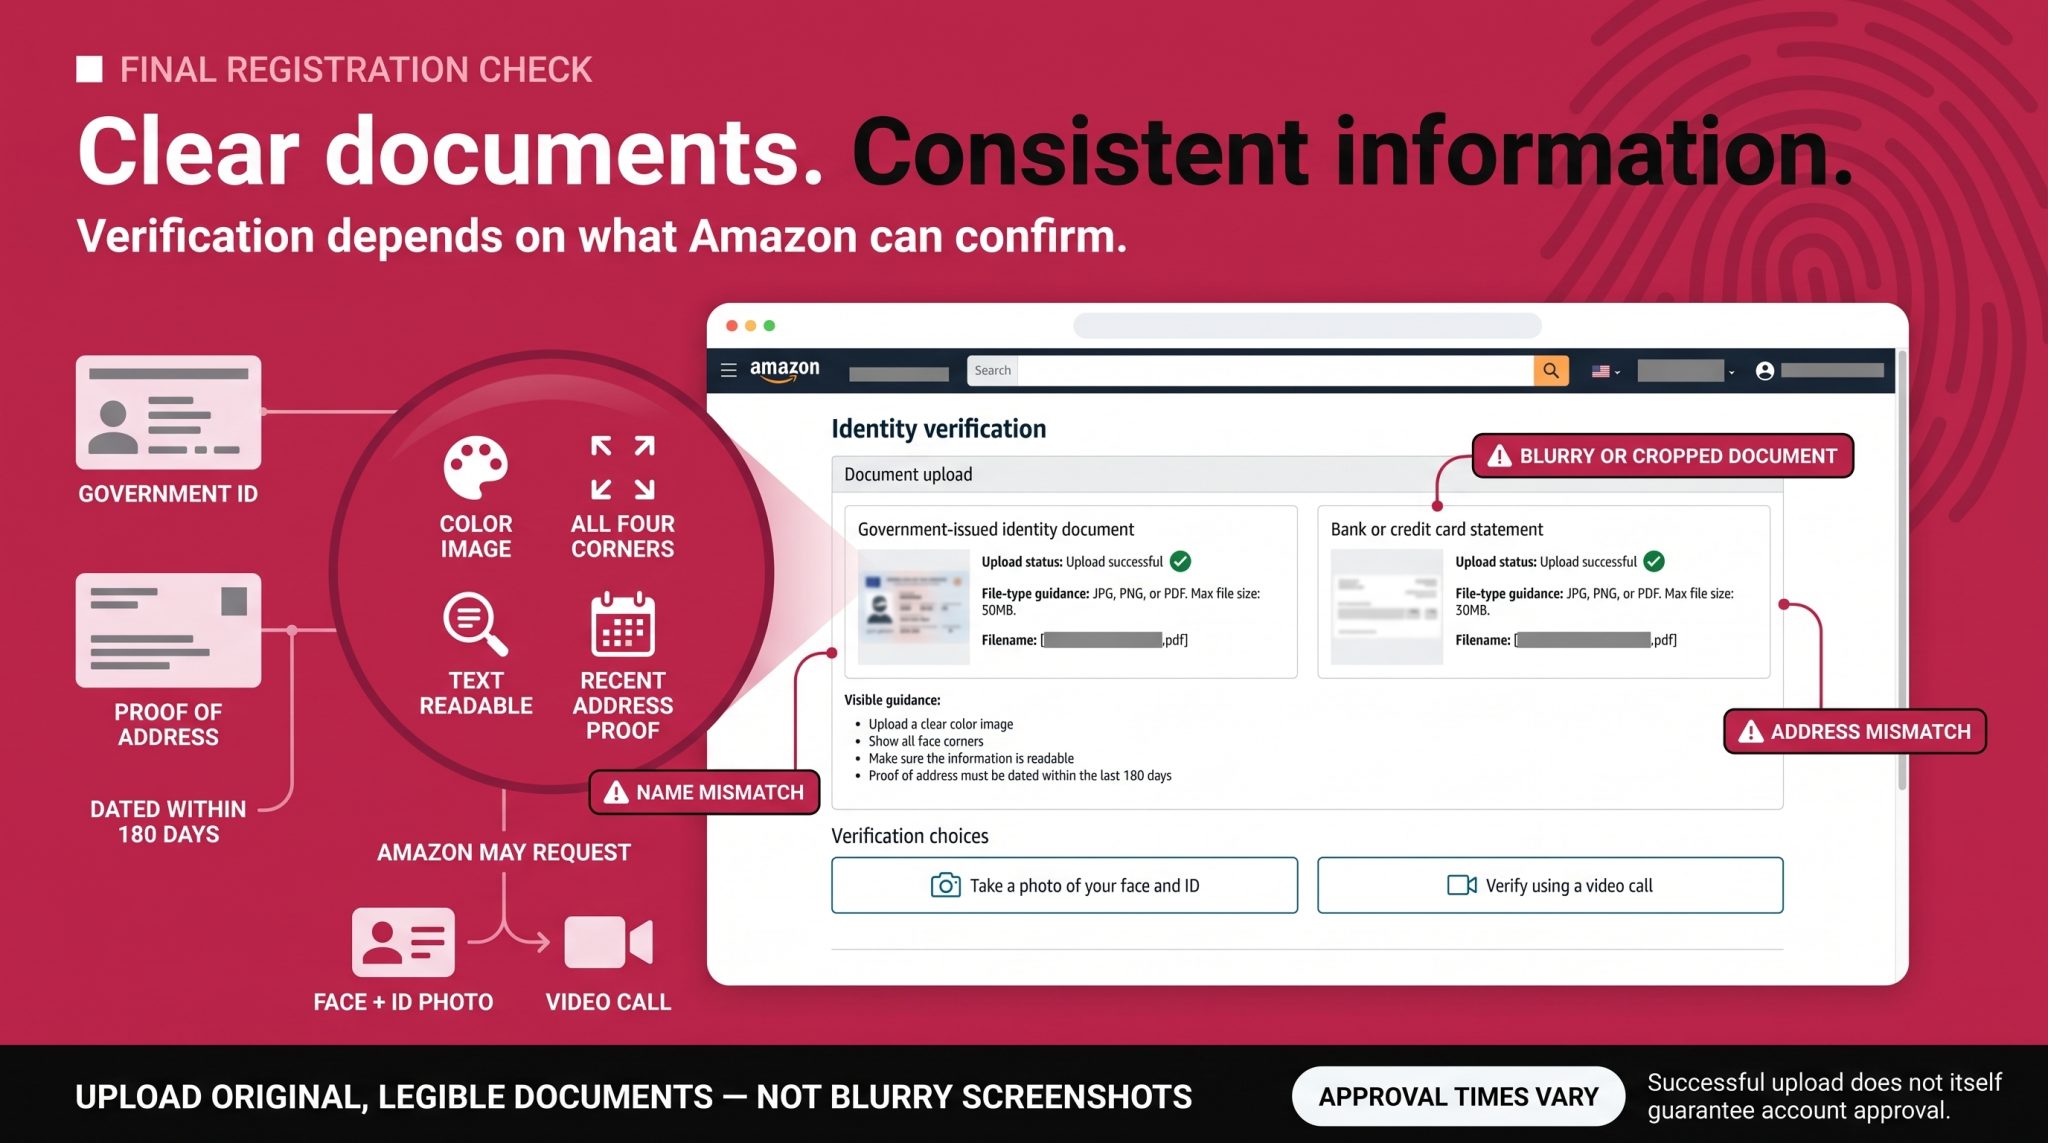
You will be asked to upload two things: a government-issued ID, and proof of your residential business address dated within the last 180 days, typically a bank or credit card statement.
Then Amazon will ask you to do one of two things. Either take a photo of your face alongside your government-issued ID, or join or schedule a video call with an Amazon associate. If it is the video call, have both your ID and your proof of address with you when you join.
Document quality matters more than people expect, and Amazon is specific about it. Use high-quality color scans or photographs. Show all four corners of the document. Make sure the text is legible. Do not submit screenshots or blurry images. Where a document should be signed, make sure it is.
You can find Amazon's current guidance on the identity verification help page, and Amazon also publishes advice on what you can prepare while verification is in progress so the waiting period is not wasted.
FBA or your own fulfillment?
You will need to decide how orders get to customers, though usefully, this is not a decision you have to finalize before registering.
With Fulfillment by Amazon, you send inventory into Amazon's fulfillment network and Amazon picks, packs, ships, and handles customer service and returns on your behalf. The appeal is obvious for a small operation. You are outsourcing an entire function, and your products become eligible for the delivery speeds Amazon customers expect.
With merchant fulfillment, you store your own inventory and ship each order yourself. You keep full control over packaging, handling, and the customer experience, and you avoid FBA's per-unit and storage fees, but you take on the labor, the carrier costs, and responsibility for meeting Amazon's delivery expectations.
Neither is universally better. FBA tends to suit products that are small, standard-sized, and fast-moving, where Amazon's per-unit economics work in your favor. Self-fulfillment tends to suit oversized or slow-moving products, businesses that already have warehousing and shipping in place, and sellers who need control over presentation. Many sellers eventually use both for different products. Because the cost comparison depends heavily on your product's dimensions, weight, and turnover, the only sensible way to decide is to model it in the Revenue Calculator.
Preparing your account before your first listing
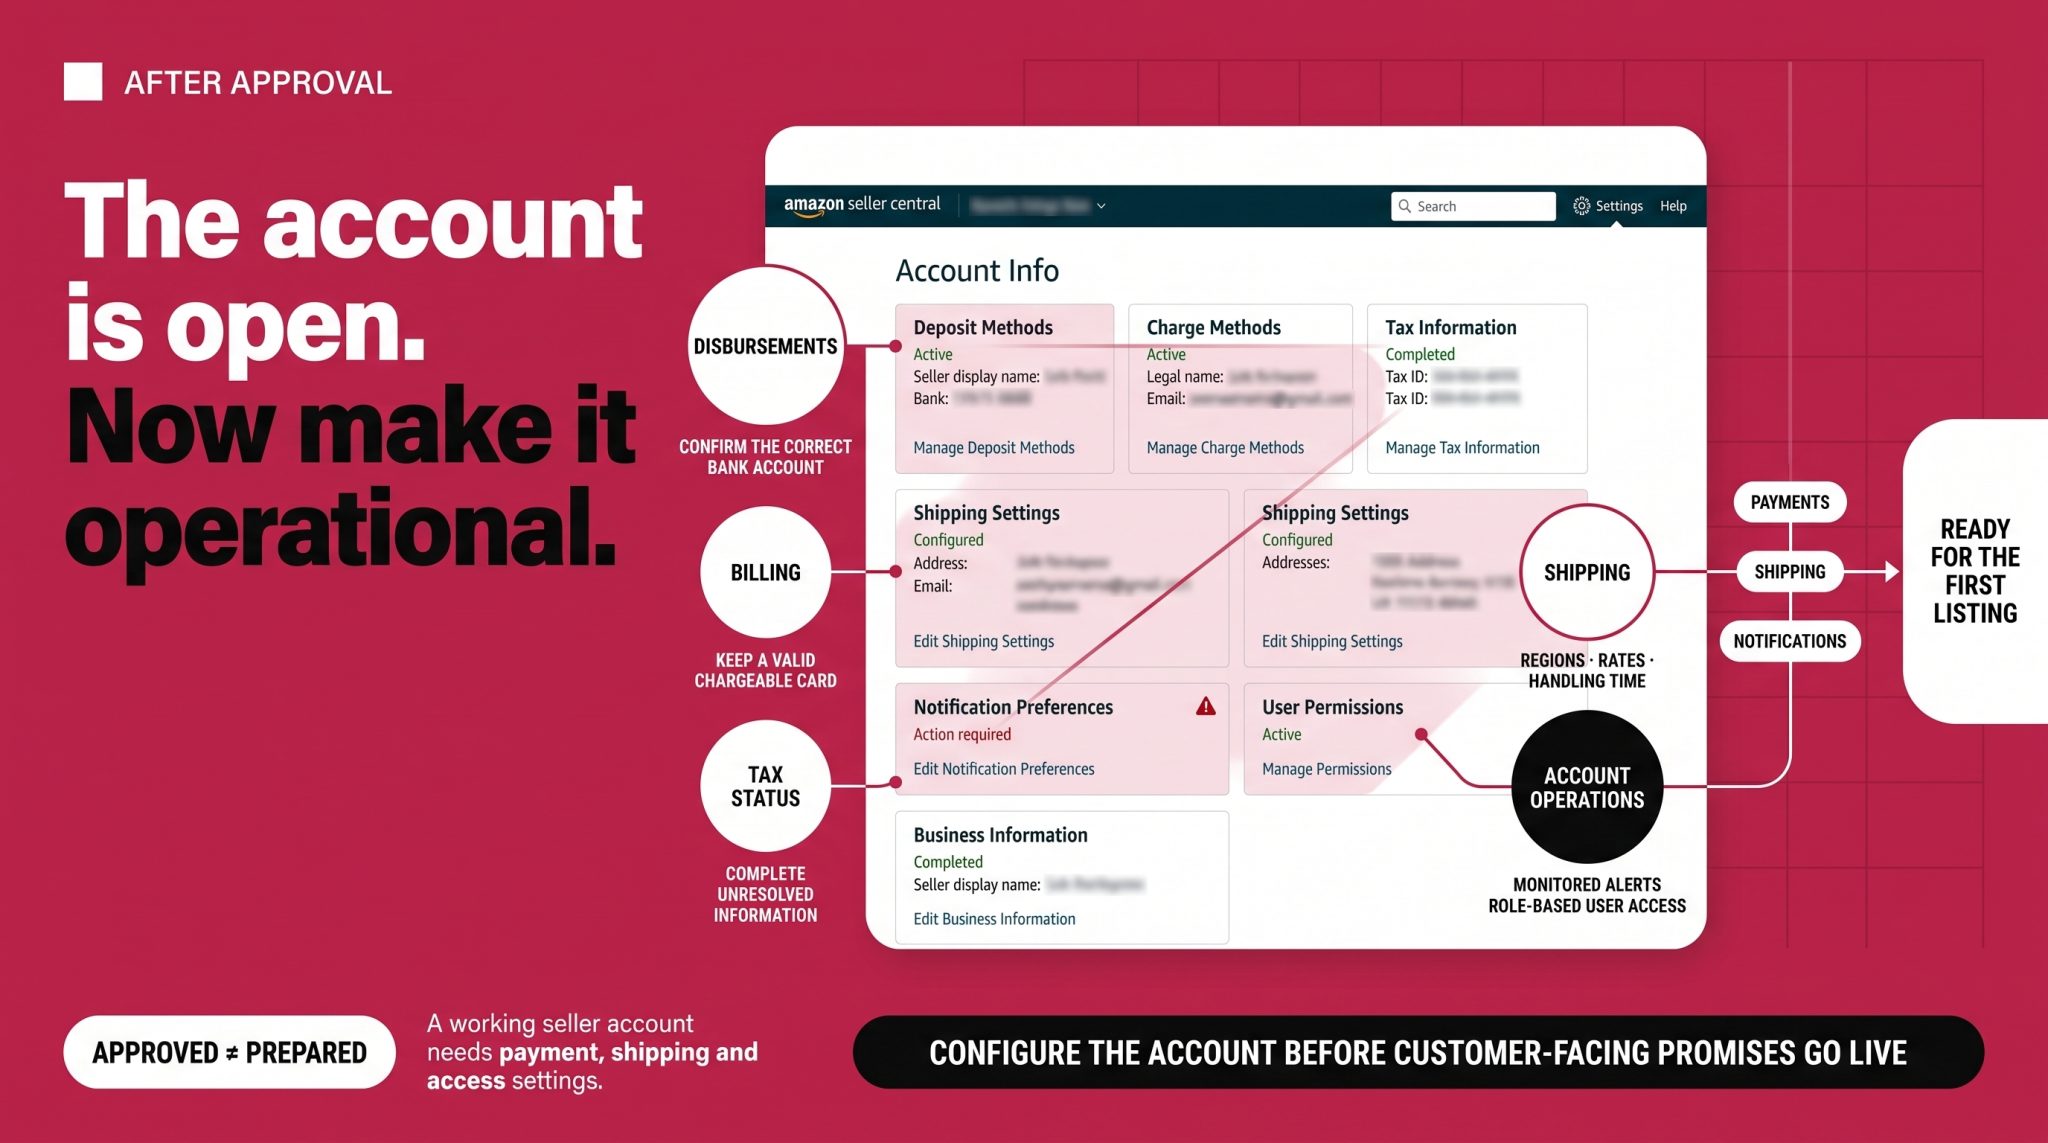
Once you are approved, there is a short list of configuration work worth doing before you list anything. Skipping it is what produces the frustrating problems later: payments that do not arrive, orders that ship to the wrong place, notifications nobody sees.
Set your deposit method so Amazon knows where to send your sales proceeds, and your charge method so it knows which card to bill fees to. Complete your tax interview if you have not already, since unresolved tax information can hold up disbursements. Configure your shipping settings, covering the regions you ship to, the handling time you can genuinely meet, and the rates you charge, because these become customer-facing promises the moment you list.
Set up your notification preferences so order and account alerts reach an address someone actually monitors. If other people will help you run the account, add them as users with appropriate permissions rather than sharing your login. And if you own a trademarked brand, complete your Brand Registry enrollment now, since several brand tools only become available once it is done.
That is the boundary of this guide. Everything beyond it, including navigating the dashboard day to day, managing orders, reading reports, and running the account as an operation, is covered in our Amazon Seller Central dashboard and admin guide.
Common mistakes that delay or complicate your start
Most of the trouble new sellers hit in their first few weeks is predictable, and nearly all of it is avoidable.
On the registration side, the recurring culprits are mismatches and dates. A name on your ID that does not match the name on your bank account. An address on your proof-of-address document that differs from what you entered during registration. A statement that has drifted outside the 180-day window. Documents photographed badly enough that Amazon cannot read them. Selecting the wrong business type. A credit card that is declined because it is not chargeable internationally. Each of these is a quick check that prevents a multi-day delay.
On the business side, the mistakes are more expensive.
Sourcing inventory before checking whether you can list it is the costliest, and the Add Products check takes minutes.
Pricing without calculating fees is the most common. It is easy to look at a competitor's price, assume you can match it, and discover afterwards that the referral fee, fulfillment, storage, and returns leave you with almost nothing.
Underestimating working capital catches out people who did everything else right. Inventory is paid for before it sells, and restocking has to happen before the first batch sells through. If you use advertising, spend can begin as soon as your campaigns go live, before the product has generated enough sales to fund that spend.
And finally, treating Amazon as passive income. It is not. The channel removes some work, since you are not building traffic from nothing and FBA removes the logistics, but it adds other work in inventory planning, pricing, compliance, advertising, and account health.
Your account is approved. What now?
Getting the account open is genuinely the easy part. What determines whether it becomes a business is what happens next: how well your listings are built, whether they can be found, whether they convert the traffic they get, and whether your first products get enough early momentum to establish themselves.
That work has its own sequence. Listing your products properly and making them discoverable is covered in our Amazon SEO and listing optimization guides. Getting new products in front of customers who have no reason to find them yet is covered in our Amazon PPC guide. And the full first-90-days plan, covering inventory, pricing, promotions, reviews, and the new seller incentives available along the way, is covered in our Amazon product launch strategy guide.
Pre-registration readiness checklist
Before you begin registration, confirm you have:
A government-issued ID, with your legal name exactly as it appears there
An email address you have decided on, separate from your Amazon customer account unless you want them linked
An internationally chargeable credit card
A bank account and routing number, held in your name or your business's name
Business registration or license details, where applicable
Proof of residential address dated within the last 180 days
Your tax information
A confirmed decision on your selling plan, based on the tools you need
A shortlist of products checked for listing restrictions through Add Products
A margin calculation for each product using the current fee schedule and Revenue Calculator
A realistic view of the working capital your first inventory order requires
If you are weighing whether Amazon fits your product, the most useful thing you can do next is not to register. It is to run the numbers on one specific product you are seriously considering, against the current fee schedule, at a realistic selling price. That single calculation tells you more than any general guidance can.
Flairox Listings
Your Account Is Ready. Build Your First Listing Faster.
Turn your product information into optimized titles, bullet points, descriptions, images and A+ Content with AI, all inside one organized workspace.
Create Your First Listing Free → ✓ Account Ready → ✓
Frequently asked questions
Not entirely. The Individual plan has no monthly subscription, so you can register without a recurring fee. You still pay $0.99 per item sold, plus the referral fee on every sale and your fulfillment costs.