 Ali Sohail
Key takeaways
Start simple with automatic targeting and dynamic bids (down only) to safely gather data and optimize later.
Choose well-optimized, retail-ready products- Amazon auto-generates ads using your listing content.
Use a clear naming structure and portfolios to keep campaigns organized and easy to manage.
Let campaigns run for at least 3 weeks before making big changes- early data is key to smart optimization.
Just launched your business on Amazon? You’re probably stuck in that super annoying loop where no one’s buying from you because you don’t have reviews, and you can’t get reviews because no one’s buying.
It’s so annoying...
But here’s the good news: You don’t need to wait for your Amazon SEO efforts to kick in till you finally start getting results. Because with Amazon PPC, you can bypass the SEO and CRO “waiting time” and immediately put your products in front of buyers in exactly the kind of places where they’re looking to buy products like yours.
Sponsored products campaigns are particularly good at doing this, so it’s no surprise that they’re the most widely used type of ad campaign on Amazon. At Flairox, we use them as a strategic lever for our clients- not just to drive immediate traffic and sales, but also to accelerate organic rankings by feeding Amazon’s algorithm the velocity it loves.
In this post, we will walk you (step-by-step) through the exact process of launching a successful Sponsored Products ad campaign. We will also go through a checklist of everything you need to do before launching these campaigns, so you get the most out of the money you spend on your ads. We will also go through some common mistakes you should avoid for the same purpose, and finally, wrap things up with a discussion on how you can ensure that sponsored products ads are the right choice for you.
Let’s get right into it.
Step-by-step Guide On How To Launch A Sponsored Products Ad Campaign (Manual & Automatic)
We’re diving straight into the steps you need to take to set up and launch your first sponsored products and campaigns. We’ll start by telling you click-by-click where you need to go to find the sponsored product ad campaign creation page.
Then, we’ll get into the specific steps and best practices of setting up each element of your ad campaign.
If you’re not sure how Sponsored Products campaigns are different from Sponsored Brand, Sponsored Display, or Sponsored TV campaigns, we strongly recommend reading our complete guide on Amazon Ad Types and their differences. If you’re completely new to Amazon Ads, and would like a comprehensive rundown of the Amazon sponsored ads ecosystem, then our beginner’s guide to Amazon PPC would be the right starting point for you. Once you’ve developed a solid understanding of Amazon PPC through these articles, circle back to this post, and you’ll find yourself being able to track the conversation a lot better.
Where To Find Sponsored Products Ad Campaign Creation Page
Step 1: Log into your Amazon Seller Central.
Step 2: Open up the hamburger menu on the top left and hover over the Advertising tab.
Step 3: When you hover over the Advertising tab, a small, sub-menu will open up. This is where you’ll see a button for “Campaign Manager.” Click on it.
Step 4: You should now be on your Campaign Manager (formerly Amazon Advertising Console). This is the dashboard where you will see a detailed overview of all of your campaigns and their performance metrics. Since this is probably going to be your first time launching a campaign on Amazon, your dashboard won’t show any metrics. However, when you eventually have a lot of campaigns running, this dashboard will be one of the most important tools for monitoring and optimizing performance.
Step 5: You should now see a screen that prompts you to choose a campaign type. You will have four options to choose from: Sponsored Products, Sponsored Brands, Sponsored Display, and Sponsored TV campaigns. Pick “Sponsored Products.”
You'll be visiting the campaign manager dashboard a lot when it's time to track the performance metrics of your Amazon ad campaigns. If you'd like to learn which metrics you should track, what they mean, and how to use them to gain insights on what to do next, read our complete guide on the 10 Amazon PPC metrics you should track.
How To Set Up A Sponsored Products Campaign
Step 1: Set An Ad Group Name

The first thing you’ll be asked to do when setting up a Sponsored Products campaign on Amazon is to name your Ad Group.
Ad Groups are containers that hold your ads, targeting settings, and products. You can create multiple ad groups in a single campaign, but if you’re just starting out, creating one ad group per campaign is completely fine.
So how should you name your ad group? Well, Amazon doesn’t impose a lot of restrictions on how you name your campaigns, but keeping a good and consistent naming convention will make managing and analyzing your campaigns much easier as you grow.
At Flairox, we keep our ad group names as informative as possible by adding indicators for things like: Product name/ ASIN, targeting type, match type, and bidding strategy.
For example:
GarlicPress | Manual-KW-Exact | Fixed
BluetoothHeadphones | Auto | DB-d
Step 2: Choose Platforms Where Your Ad Will Appear
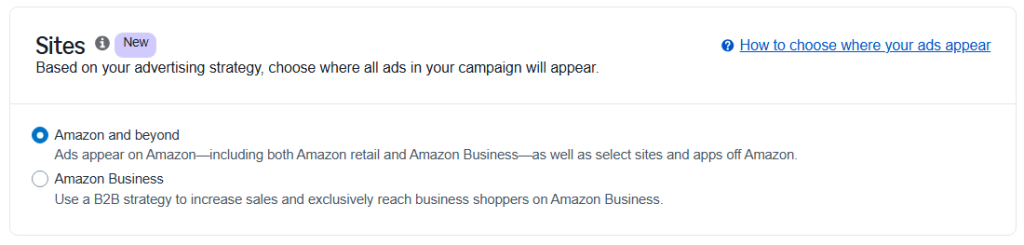
In this step, you’ll decide where your Sponsored Products ads will be shown. Amazon now offers two placement options under “Sites.”
Amazon and beyond: Your ads will appear on Amazon.com (including Amazon Retail and Amazon Business), as well as on selected external sites and apps off Amazon. This gives you maximum reach and visibility across the entire Amazon ad network.
Amazon business: Use this option if you're targeting B2B buyers specifically. Your ads will only show to registered business shoppers on Amazon Business- ideal if you sell in bulk or to commercial buyers.
For beginner sellers, Amazon and beyond is usually the better choice. It gives your campaign maximum exposure across Amazon’s network, helping you generate traffic faster and collect valuable performance data early on.
Step 3: Choose Which Product(s) You Want To Advertise
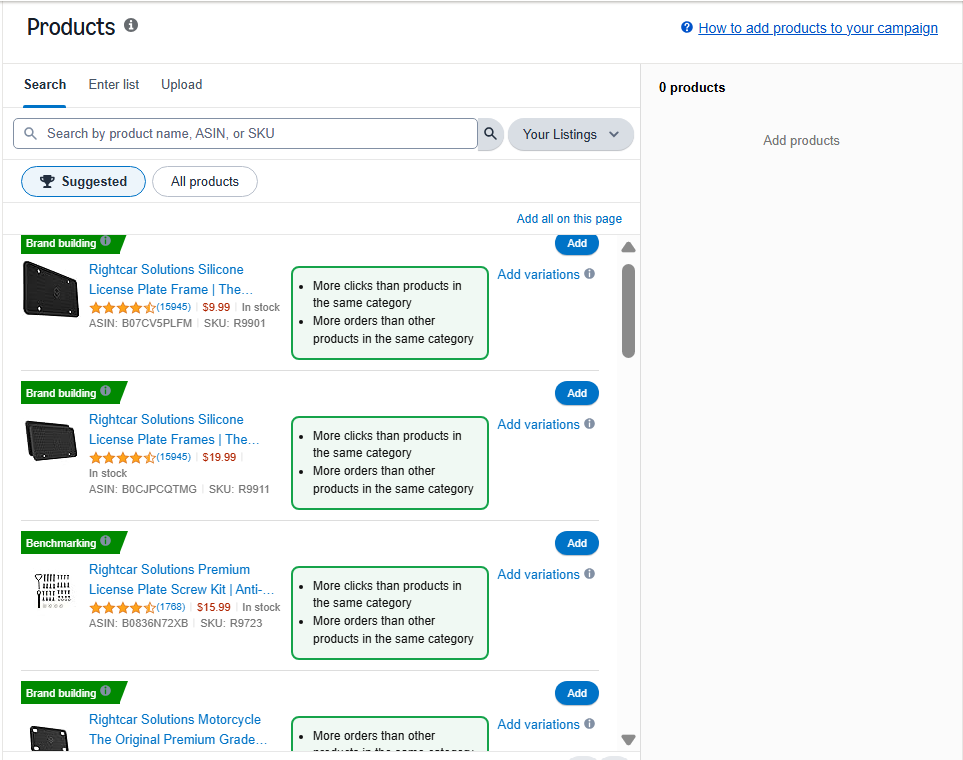
Next, you’ll choose which products to include in your Sponsored Products campaign. This is a crucial step - especially if you're working with multiple SKUs or launching for the first time.
Amazon gives you three ways to add products to your campaign:
Search: You can search your product listings by their name, ASIN, or SKU using the search bar.
Enter List: This option let’s you manually enter ASINs or SKUs.
Upload: This option lets you upload a file containing the product IDs you want to advertise- this is suitable for larger businesses that promote in bulk.
You can choose whether you want to advertise a single product or multiple products, but if you do select multiple products, make sure they belong to the same category.
It’s also worth noting that Amazon doesn’t give you a lot of creative freedom to decide how your ad appears i.e., it doesn’t let you design your ad creatives or headlines separately. Instead, it recycles the title, images, price, and ratings from your actual product listing (which is also why we mentioned earlier that you should only start investing in PPC once you’ve laid a solid SEO and CRO foundation for each product listing on your store.
If you want to learn how to launch Sponsored Brands Campaigns, we have a complete guide that will walk you through the entire process step-by-step!
Step 4: Choose How You Will Target Customers
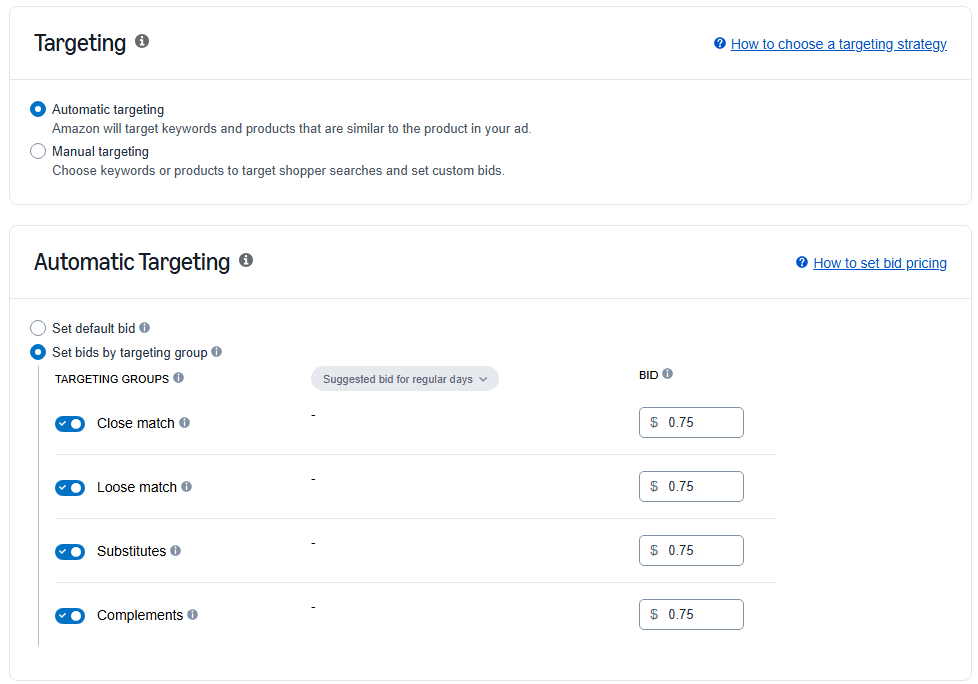
There are two levels of choices when it comes to targeting. On the higher level, you have to choose between Automatic Targeting and Manual Targeting. Here’s how they’re different:
Automatic Targeting: With automatic targeting, Amazon decides where your ads appear based on your product listing content and shopper behavior. It uses its own algorithm to match your ad to relevant customer searches and product detail pages.
Manual Targeting: Manual targeting gives you full control. You choose whether you want to target keywords or products, and then you define exactly what those targets are.
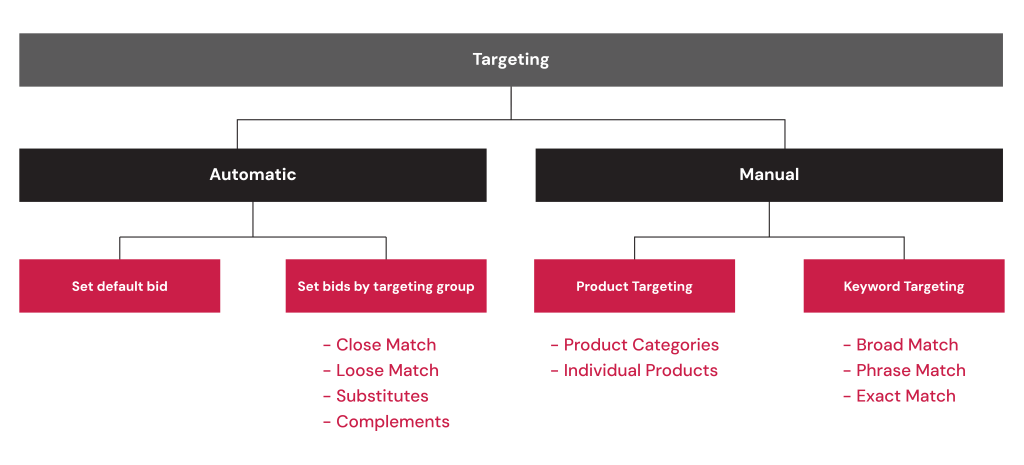
If you choose Automatic targeting (which is what we recommend for your first campaign), you don’t have to adjust anything further, and you can move on to the next step. If you choose manual targeting, you get another layer of choice where you get to pick whether you want to target by keywords or by products.
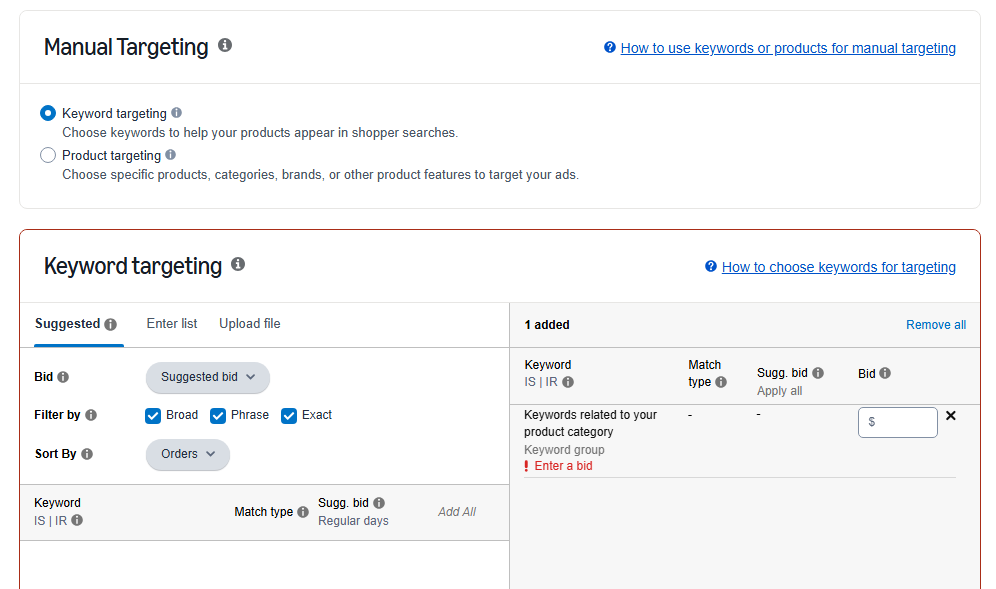
Keyword Targeting: This option allows you to show your ads when shoppers search using specific search terms. You can enter your own keywords if you’ve done your own keyword research (which we highly recommend) or you can use the recommendations Amazon gives you.
Once you’ve picked the keywords you want your product to show up for, you also get to pick how precisely you want your ad to match your shopper’s searches (aka match types).
You have three match types to choose from. You can go with broad match, where your ad appears for related variations of your keyword, exact match, where your ad shows only when someone searches your keyword exactly as you entered it, or phrase match, where your ad appears when the shopper's search includes your keyword phrase in the same order, along with other words before or after.
Since this is likely going to be your first campaign, you should go for a broad match targeting to gather as much information as you can about which searches actually get you sales.
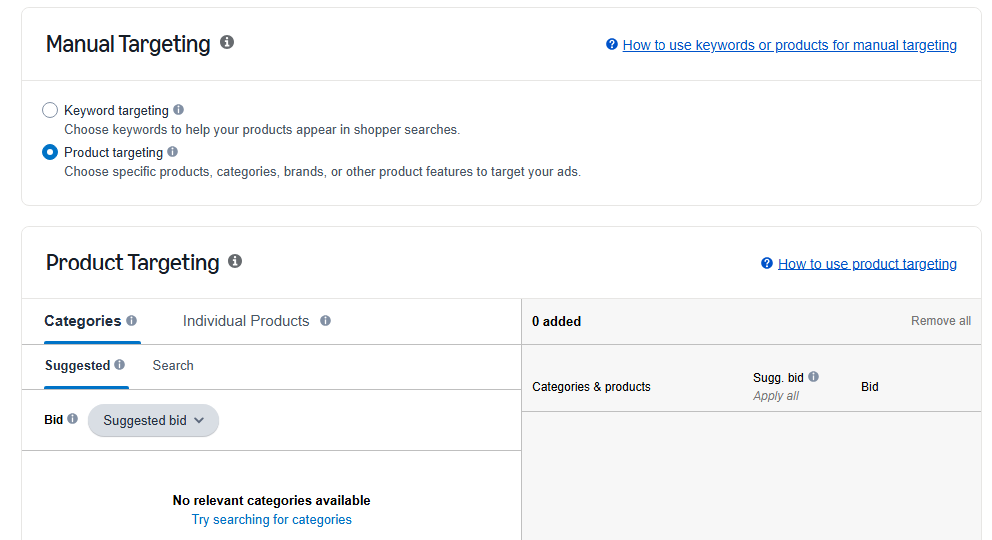
Product Targeting: If you go for product targeting, you can target specific product detail pages. This lets you:
Run your ad on a competitor’s product details page
Defend against competitors who want their ad to show up on your product details pages, or
Get your ad to show up on complimentary products in your niche.
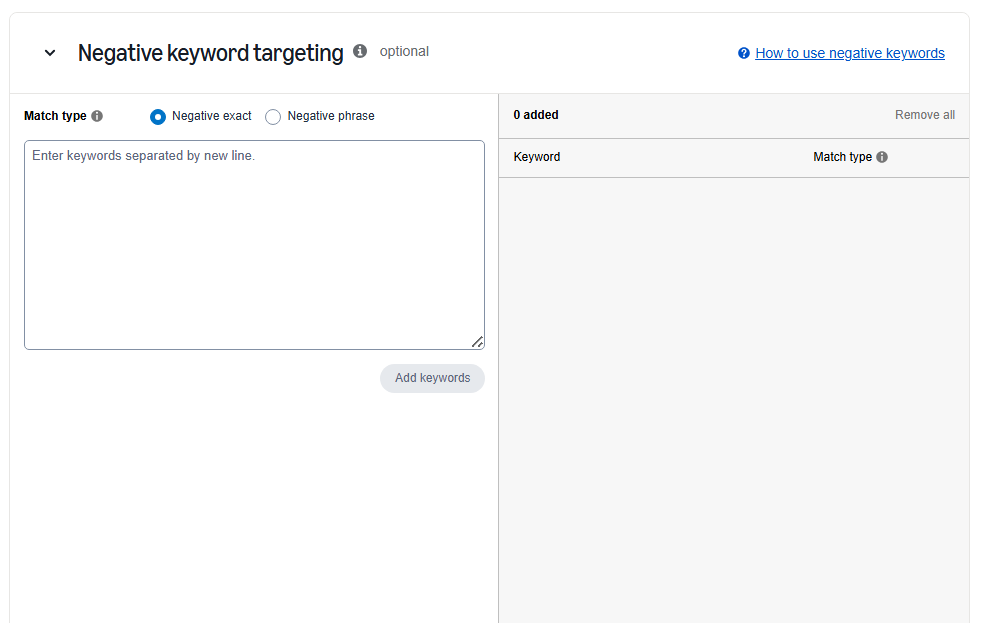
Step 5: Negative Keyword & Product Targeting
Amazon doesn’t just let you choose what keywords or products you want your ad to appear for. It also lets you choose the keywords and products you do not want to appear for (aka Negative targeting).
If you’re a beginner, you should not implement negative targeting yet. Instead, try and collect as much data as you can about what kinds of product pages or searches bring the most conversions for your ads. At the same time, look at the data for the kind of product pages and keywords that never bring you any conversions.
Collecting and analyzing this data before implementing any sort of negative targeting ensures that (a) you will not end up negatively targeting a keyword or product page that does bring in conversions, and (b) that you will correctly target keywords that actually waste your ad spend.
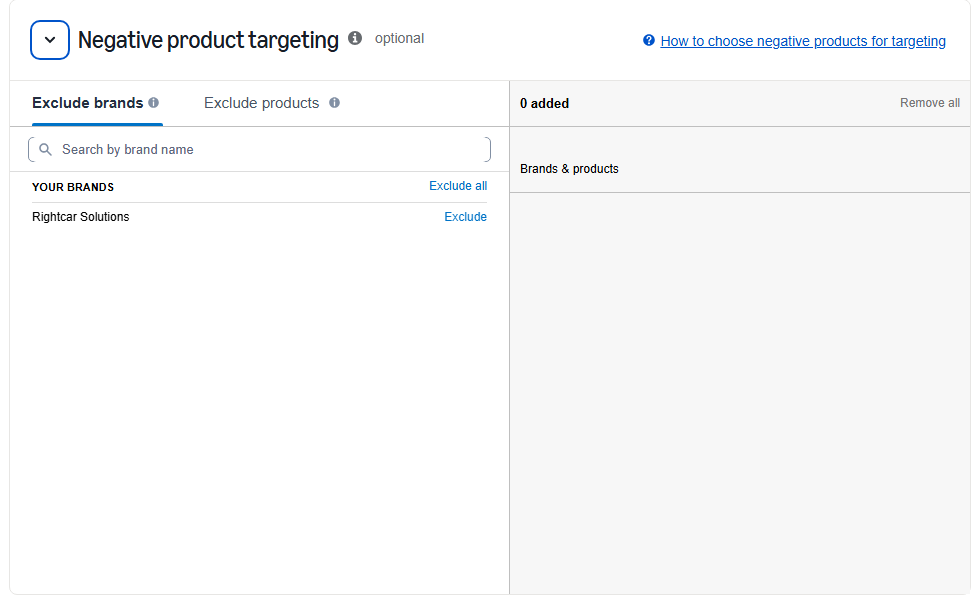
Step 6: Choose Your Bidding Strategy
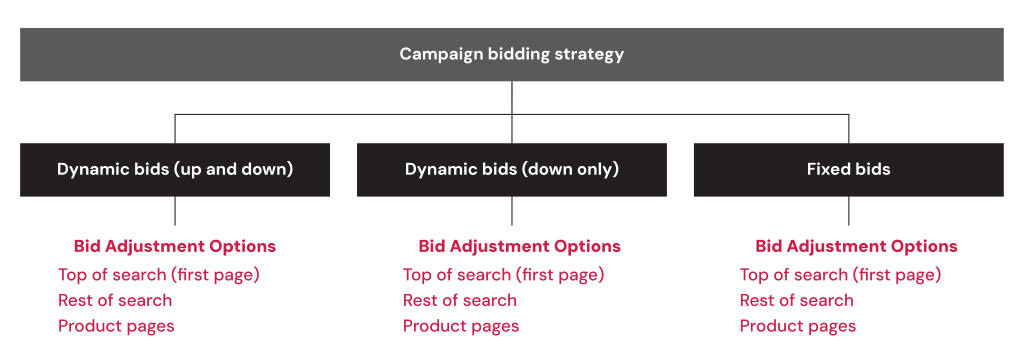
Just like targeting has two levels of choices, bidding does too. At the top level, you choose your bidding strategy.
Amazon gives you three strategies to choose from:
Dynamic bids (Up and down): Amazon increases your bid up by 100% when it thinks a click is likely to convert and lowers your bid when it believes a click won’t lead to a sale.
Dynamic bids (Down only): Amazon does not increase your bid when it thinks a click is likely to convert, but it does reduce your bid when it thinks a click is less likely to convert.
Fixed Bids: Amazon does not alter the bid you placed at all.
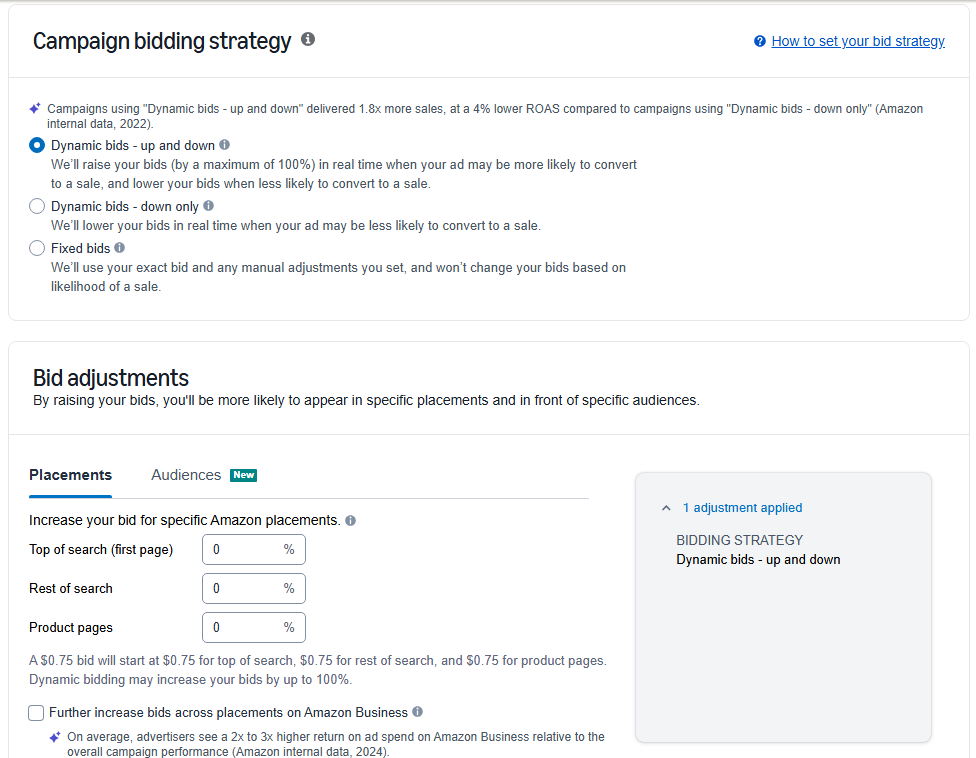
Which one should you choose as a beginner? Well, a lot of sellers prefer going for Dynamic bids (down only) since it ensures cost savings and does not risk extra spending. Although, it is worth noting that according to Amazon’s internal data (2022), Dynamic bids (up and down) lead to 1.8 times more sales (although at a 4% lower ROAs).
If you want to play it safe, go for dynamic bids (down only). If you want to experiment and see what works for you best, go ahead and try dynamic bids (up and down).
We have now covered the first level of choice you need to make when it comes to setting your bid. The second level of choice is choosing something called “Bid Adjustments.” This is an optional step where you can choose to increase your bids by a certain percentage for certain ad placements if they work well for you.
More concretely, Amazon lets you choose whether you want to increase your bid for the following placements by a certain percentage:
Top of search (first page)
Rest of search
Product pages
If you’re a beginner, or if you have no previous PPC performance data for the product you’re about to promote, it’s best to not tamper with these values just yet. Wait till you collect enough data to know which placements perform well for you. When you know how well each placement works for you (and by how much), you’ll be in a much better position to place these adjustments.
Step 7: Set A Campaign Name, Daily Budget, and Time Frame
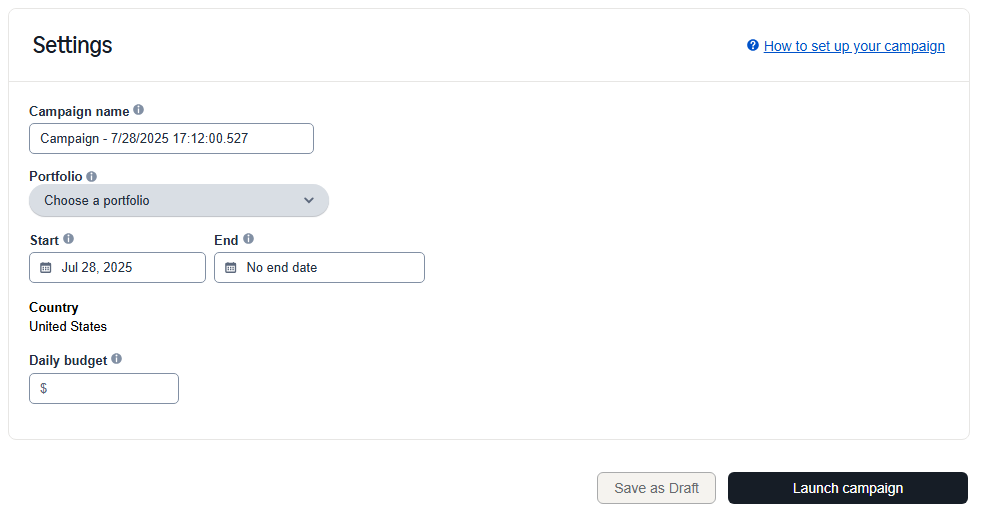
You’re almost ready to launch your first campaign- you just need to quickly enter a final few details. What’s left to specify? These four things:
Your campaign name
Choosing a portfolio
Start and end dates for the campaign
Your daily budget
Your campaign name is what you will see in the campaign manager dashboard we spoke about earlier, so to make sure you never have to spend time figuring out which campaign you’re looking at, try to make the name as helpful as possible. At Flairox, we include indicators for the following details in our campaign names, so they’re easily identifiable:
Campaign name
Portfolio
Start + end date
Daily budget
Example of a helpful campaign name: SP- Product Launch- Insulated Bottles - July
Next up, let’s choose a portfolio. Portfolios are folders that help you organize your campaigns inside Amazon’s Campaign Manager. You can group campaigns by product line, brand, season, or goal.
Examples of what you could make portfolios for:
All campaigns for a single brand or ASIN
Grouping launch vs evergreen campaigns
Separating international markets
If you're new, you can skip this or create a simple portfolio like “Main Catalog” or “Product Launches” to keep things tidy from the start.
Set your start date to “Today” if you want the campaign to go live right away. Amazon campaigns usually activate within an hour.
Setting an end date is optional- many sellers leave this blank so the campaign runs indefinitely and can be paused manually when needed.
However, if you're:
Running a limited-time launch
Promoting seasonal products
Working with a fixed budget
…then setting an end date ensures the campaign shuts off automatically (although, you can always extend the end date later). As a beginner, you should at least run your campaigns for 3 weeks (or one month) to collect data. Then, you can use that data to adjust your campaign settings and make them perform even better for you.
Finally, it’s time to choose your daily budget. This is the maximum Amazon can spend on your campaign in a single day.
How should you decide your daily budget? Well, here are a few tips:
Start small: $10–$20/day is a good starting point for most beginners.
Make sure your daily budget can cover at least 5- 10 clicks per day, based on your average CPC (cost per click) in the subsequent days.
As you see results, scale your budget on profitable campaigns.
Keep in mind, though, that if you set a daily budget that’s too low, your ads may stop showing early in the day- limiting your performance and reach.
What To Do Before You Launch A Sponsored Products Campaign?
As you’ve probably noticed from the steps outlined above, launching a Sponsored Products campaign involves more than just opening Campaign Manager, clicking “Create Campaign,” and checking a few boxes.
Some parts of the setup process require thoughtful preparation ahead of time. For example, choosing which keywords to target or which ones to exclude as negatives isn’t something you want to figure out on the fly. These decisions- and many others- rely on groundwork you should complete well before launch day.
But don’t worry, we won’t let you go through the trouble of figuring out everything you need to do before you launch a campaign by yourself. In this section, we’ll make you a checklist of everything you need to do. Let’s dive right in.
1) Get Clear On Your Launch Goals
Be very clear on why you’re running this campaign. Is it to build awareness? Is it to make your brand top-of-mind? Is it to generate profitable sales? Each goal may require a different bidding strategy, targeting approach, or pacing plan.
Your goals influence everything- from keyword prioritization to bid aggressiveness. Going in with a clear objective makes every setup decision faster and more intentional.
2) Plan Your Campaign Structure
Decide in advance how you’ll organize your campaigns and ad groups. Are you launching one campaign per ASIN, or grouping similar products together? Will you split match types into different ad groups, or combine them? Define your naming conventions now so everything stays clean and easy to manage.
A clear structure saves you from making disorganized choices during setup. It also makes reporting and optimization much easier down the road- especially as you scale.
3) Conduct Keyword Research
Build your keyword list before you even think about campaign structure. Use tools like Helium 10, Jungle Scout, and Amazon Brand Analytics to pull in high-volume, high-relevance search terms. Include a mix of broad, phrase, and exact match keywords, and organize them based on intent- branded, generic, competitor, and long-tail.
Don’t forget to identify negative keywords that could waste money. If you conduct your keyword research beforehand, you’ll already know exactly which keywords to target, which ones to add to your negative targeting list, and which match types to use- absolutely zero guesswork!
4) Optimize Your Product Listing Pages For SEO & CRO
Before you send traffic to your product, make sure it’s ready to convert. This means writing a clear, keyword-infused title, compelling bullet points, and a benefit-driven product description. Include high-resolution images, ideally with lifestyle photos and a product video if possible. If you have access to A+ content, use it to strengthen your listing even more.
5) Calculate Your Budgets
Determine your daily budgets and starting bids ahead of time. Use Amazon’s suggested bids as a reference, but adjust based on your goals and how competitive each keyword is. Also decide how aggressive you want to be during launch- will you go in strong to collect data fast, or take a more gradual approach?
When launching, you’ll already know how much you’re spending and where. This allows you to move through setup quickly without worrying about overspending or underbidding.
Take care of all of these things beforehand, and not only will you be able to set up and launch your campaigns fast, but you’ll also significantly improve your chances of running a successful PPC campaign, since these tasks will ensure you’re moving forward strategically and as part of a single cohesive strategy.
Common Mistakes To Avoid When Launching A Sponsored Products Campaign
Even with good preparation, it's easy to make strategic missteps during the actual launch of a Sponsored Products campaign. These aren't beginner oversights like skipping keyword research- they’re mistakes that happen in the moment, when decisions seem small but can create downstream issues. Here’s what to watch out for.
1) Starting with too low of a budget
A tiny daily budget may feel safe, but it often leads to slow learning and underperformance. Your ads may not get enough impressions to gather meaningful data or even exit the learning phase. You can avoid this by setting a budget that matches your campaign goals and keyword competitiveness. You can always scale back later if needed, but starting too small will hold you back.
2) Combining too many Keywords or ASINs in one ad group
Stuffing a single ad group with dozens of unrelated keywords or multiple ASINs is a recipe for poor performance. It makes it harder to track what’s working and impossible to optimize effectively. Grouping similar keywords together by theme or intent, and keeping ASINs separated when they don’t perform similarly can help you avoid this. Clear segmentation gives you better data and more control.
3) Making assumptions without data
One of the most costly mistakes sellers make is assuming they know how a campaign will perform- which keywords will convert, what bid will win, or which ASINs will respond best- without actually testing. It’s easy to fall into the trap of thinking, “I know my customer,” or “this keyword always works,” but advertising is rarely that predictable. Just because something worked organically or for a different SKU doesn’t mean it will perform the same way in a paid environment.
The smarter approach is to treat your first few weeks as a data collection phase. Launch with a clear hypothesis, but stay open to surprises. Let the numbers guide your optimization, not gut instinct. Making early decisions based on real data- not assumptions- is what separates profitable campaigns from expensive guesses
4) Making Adjustments too quickly
Sometimes, the mistake isn’t doing too little- it’s doing too much. Sellers often panic after a day or two of poor performance and start making rapid-fire changes that don’t allow the campaign to stabilize. Let your campaign run for a few days to gather enough data before making major adjustments. Optimization takes patience, especially in the early phase.
Good Luck With Your Launch!
You’re now finally ready to launch your first Sponsored Products ad campaign- that’s pretty exciting! We genuinely hope you’re able to see the true power of Amazon advertising. And if you ever get stuck, we have guides that will help you through it.
Frequently asked questions
No, you don’t. That’s the beauty of Sponsored Products ads- they help you get visibility and traffic even if your listing doesn’t have reviews yet. In fact, running ads can help you get those initial sales that lead to reviews.